
Loading a Quilt Top
on a Longarm Frame
*affiliate links in use*
Thanks for stopping by! In case you missed it, there's a thorough explanation of the first step in loading a quilt: Loading a quilt backing.
As for the topic at hand...
I'll start by saying this:
Don’t float quilt tops. Ever. Goodbye.
xoxo
Love forever,
Jess
I KNOW!
Who knew I’d stir up such controversy?! Am I being overly dramatic? Yes, of course.
But for real, do I float quilt tops? NOPE! I really don’t. Not anymore.
Full float
Let’s back up a sec… to “float” a quilt top means that the quilt top is layered on the batting and backing but not secured directly to the longarm frame in any way.
Floating is very popular and can be done successfully. It’s so much faster than loading a top! I’ve floated PLENTY of tops in my day. Mostly successfully.
Partial float
And to be strictly technical here, what I do now and what I will show in this article is a partial float because the bottom of the quilt is secured to the quilt top roller but the top edge is basted directly on the loaded batting and backing.
Full attachment
Full attachment would be the opposite of a full float and would mean pinning to the take-up canvas at the top and the quilt top roller along the bottom. When I’m quilting pantographs, I don’t see how that could even work as the stitching would very likely end up on the canvas or 1/4” in from the edge of the quilt, which I wouldn’t like either. Let’s just say that fully attaching is not practical for my needs (and honestly, I don’t think I’ve ever seen anyone else do it).
For the sake of this discussion, I’ll use the term float to refer to full float (no attachment) and load/loading to refer to partial float (pinning to the quilt top roller).
Problems
When you are a longarm quilter, you have to be an investigator and problem-solver. I had sporadically been getting pretty terrible results and I had no idea why. Here’s my strife in the pictures that follow.
I think you'll be able to see the issue if you focus on the spacing between the quilted motifs in the examples and compare the normal spacing on the right with the "off" spacing on the left in each case.
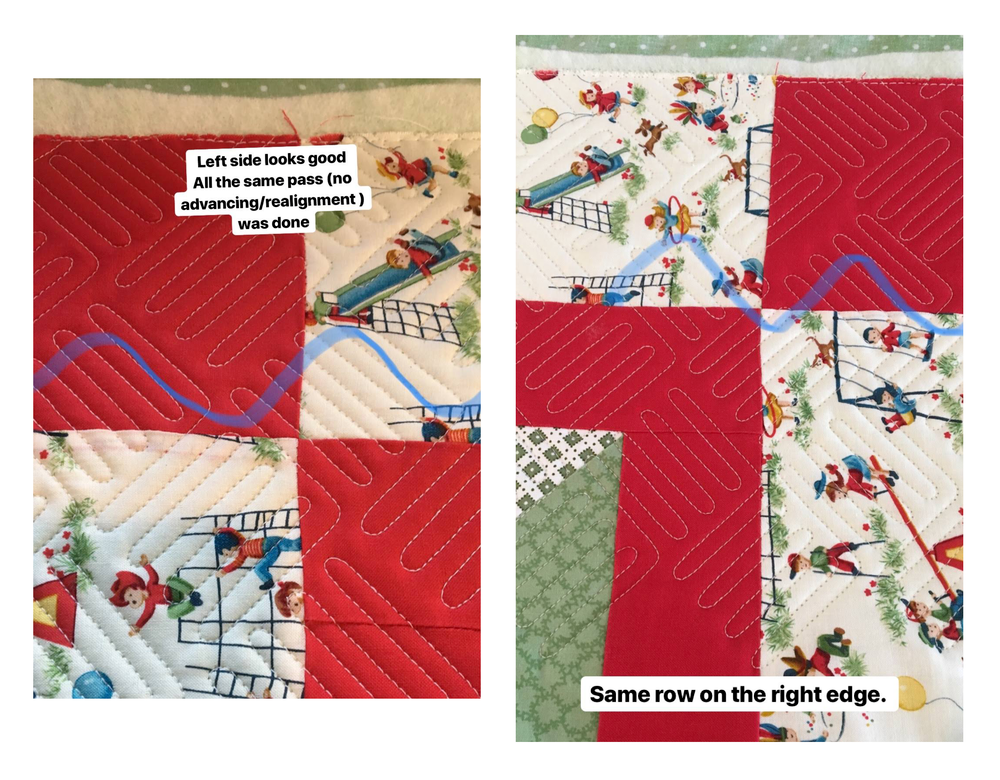
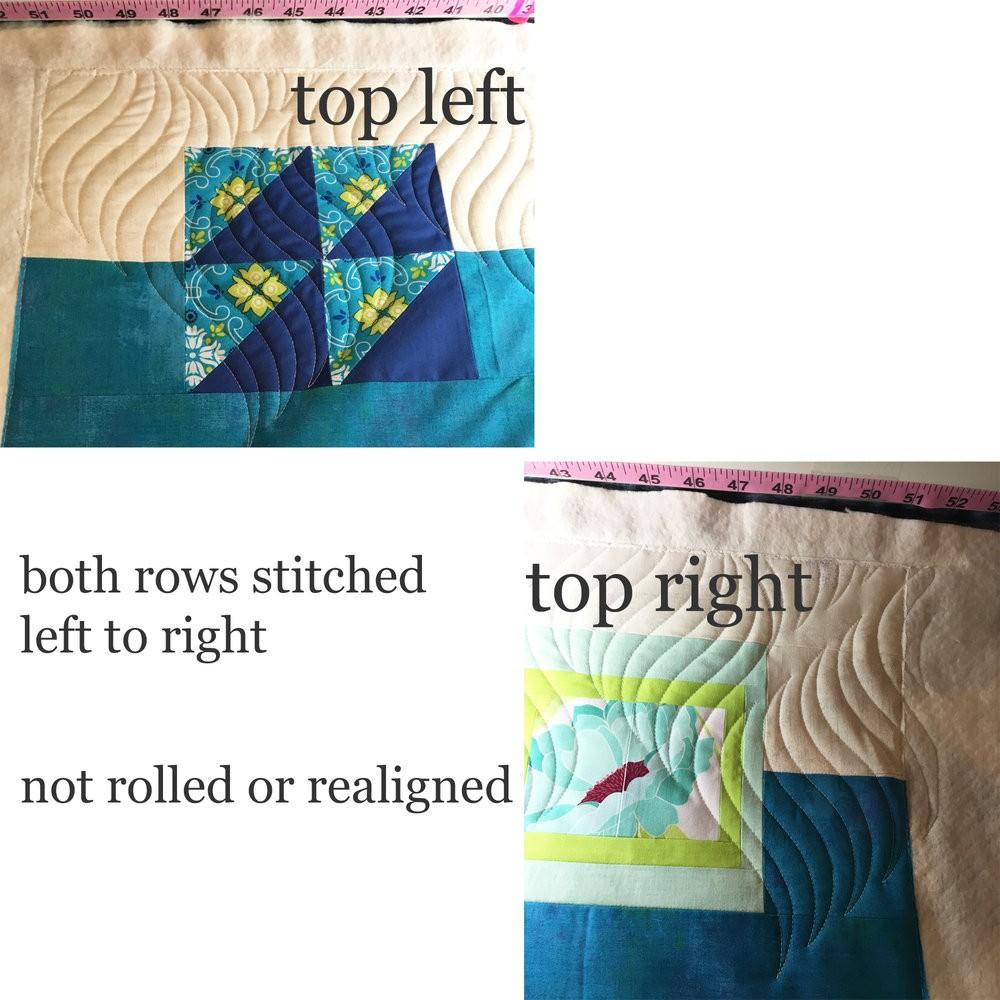
My stitching which had normally been pretty accurate was so off… but not all the time, only with certain pantographs. I knew it wasn’t an alignment issue because this was on the initial pass. I hadn’t advanced the quilt in either case. It didn’t appear to be an issue with my rails, one quilt was tiny and the other was huge and the issue happened in the same way on both.
My Intelliquilter has what is called a “drift test” to test motor accuracy. Each time, my machine would pass the test perfectly, so I knew the motors weren’t off. The only conclusion “we” came to (with the help of the Intelliquilter Facebook group), was that the actual top was moving slightly because one common link was that I had floated both tops.
I really didn’t believe it was possible, but now when I quilt these patterns and load my tops, I haven’t had the issue again. My theory is that the stability of pinning to the quilt top roller cuts out any wiggle-room-funny-business.
A few factors here to keep in mind if you’re comparing your experiences to mine:
-
I quilt exclusively digitally.
-
I quilt densely.
If you are a custom quilter or hand-guided quilter, you might not have any issues with floating.
Or if you’re a digital quilter, you might be able to get away with floating a lot of the time (I did). But, if you happen to have the problem that I’ve shown, loading your top may help solve your problem, too!
Because I haven’t figured out a rhyme or reason as to which pantos are safe and which are dangerous (it happened with a few others that I was too frustrated to document). I think that the way in which these two designs in particular stitch out "back and forth" could add to the movement of the quilt layers. But since I'm not sure, I just load every top now. It beats unpicking large areas of quilting, which is what I had to do for both quilts above.
Loading the top also means that the bottom edge will end up straight, which was a common issue that would happen when I would float.
I seem to have an easier time being able to detect fullness in a quilt when it’s loaded as opposed to when it’s floated.
For me, the benefits of loading outweigh the potential pitfalls when I float.
The rest of this article will be my top loading process. Please enjoy!
Loading the top step-by-step
After the quilt backing is locked and loaded, now it’s time to get your batting and top ready for quilting.
BTW, does it sometimes feel like 70% of the work is loading properly and then all of the quilting combined is like 30%? It does for me.
Layering the batting
I drape the batting over the quilt top roller and position it on the center of my frame, which should also be on the center of the backing.
I don’t really specify to clients how much batting to provide since most of them buy it from me. (There is a lesson in the Longarm League membership all about batting.) The short version is that I stock mostly queen rolls (93” wide) and cut from the roll a size 5” larger than the width of the quilt top (or the shorter side assuming both sides are smaller than the width of batting). Example: If I have a quilt top that is 50” x 70”, I will cut 55” inches from the batting roll. This gives me 2.5” of extra on each side, which feels comfortable for me.
Being aware of the size of the quilt top is key, again. If I have a quilt top that in 92” long and am using a 93” batting, I position the top of the batting down a few inches from the leveler bar, pretty much right in the position where the quilt top will be because I won’t have much wiggle room at the bottom.
Maintenance Detour
I know we’re just getting started but now is when I take a bit of a detour and do basic machine maintenance.
Blow out the fluff
I quilt with a 2001 APQS Millennium. I specify this because maintenance will be different for different brands of machines. For APQS machines, air compressors are totally fine to use as a way to clean out a bobbin area because it is walled off from the “guts” of the machine. I can use my air compressor to blow all of the fluff out and not damage my machine. Your brand may highly discourage this practice based on the anatomy of your machine. You might need to use a soft cloth or brush or vacuum or another recommended means. Please see your user manual for the proper way to clean your machine.
I do need to tell you that I freaking LOVE my air compressor and would’ve bought one immediately after buying my machine had I known how great it is.
The hose and the nozzle for the air compressor are sold separately, btw… I learned that the hard way. Oh, and also, if you buy an air compressor, please also buy ear protection because this sucker is so loud (but so good). I’ll link to the headphones that I have because
-
I’m an obsessive listener (not just music but podcasts and audiobooks, too)
and
-
they have a noise canceling feature.

I simply do not run my air compressor without having protection over my ears. If I have someone in my sewing room with me, I give a countdown out loud and make them cover their ears. Every time.
Using the air compressor, I’ll blow out the bobbin area and the bobbin case itself. I take a straight pin and follow the little guide on the side that occasionally harbors stowaway lint (shown below). You could also use a business card or something softer to clean this area. Being over-vigorous here could mean damage to the bobbin case.

Oiling
Next, (again, this is what is appropriate for my APQS), I put one drop of oil in the hook area of my bobbin assembly.
I make sure the machine head is off to the side of the quilt layers and I check to make sure the needle is unthreaded, then I run my machine at a very low speed for a minute just to get the oil well-lubricated in the hook assembly. I stop after about a minute of this low speed idling.
If I haven’t done it that day, I also touch my wicks on the top of the machine head to see if they need any oil.
I absolutely do not oil my wicks more than once a day. Over oiling can cause excess to drip onto the quilt top. If the machine needs it, I put one drop on the wicks that need it.
Threading
Check with your machine’s manual for the proper thread path. Most of the time I cut the thread from the spool at the back of the machine and tie a new spool onto the end of the existing thread length that is already threaded. Pulling the old length of thread through the needle at the front of the machine will bring the new color into it’s properly threaded path. This practice should decrease the chance of mis-threading.
Changing the needle
I don't necessarily change my needle for every quilt, but you could. I might change them maybe every other quilt or every 3rd quilt, maybe longer for a series of small quilts. There are many factors are at play here, if you are quilting a top with very thick seams or a difficult fabric to quilt through or if the size of your quilt is enormous, I would change it out faster. The bottom line is that I won’t skimp on changing a needle if it needs it, but I also don’t change them out for every quilt just because.
Back to loading
Stitching a registration line
The reason why I oil at this stage (I’ve put one drop in the hook & let it run for a minute or so to dribble the excess off), is that I make a “registration line” through my batting and backing as close to the leveler bar as I can get. Stitching the line gives any remaining traces of oil a chance to work itself out completely before I load the top.
Starting at the left edge of the layered batting-and-backing, I use my Intelliquilter to engage the horizontal lock, making sure the line stays straight and true. And I quilt one line all the way across. It’s sort of tough to see in the photo below so I added arrows. I use this stitching line to know exactly where to position the top edge of the quilt top to ensure straightness.

At this point, I pick up the end of the batting to weave under the quilt top roller, smoothing the whole thing out. With the stitching in place at the top, it stays nicely in place.

Loading the top
For the purposes of this article, I’m only going to be talking about loading a top vertically (instead of horizontally/sideways). This is how I load the vast majority of quilts.
If the center top and bottom of a quilt is not obvious based on the patchwork, I crease and mark with a pin the top and bottom edge just like we did with the backing from my previous article.
Align the center of the bottom edge of the quilt with the center of the canvas quilt top roller and pin the entire edge, starting at the center and working out to the left side, and then back to the center to pin to the right.

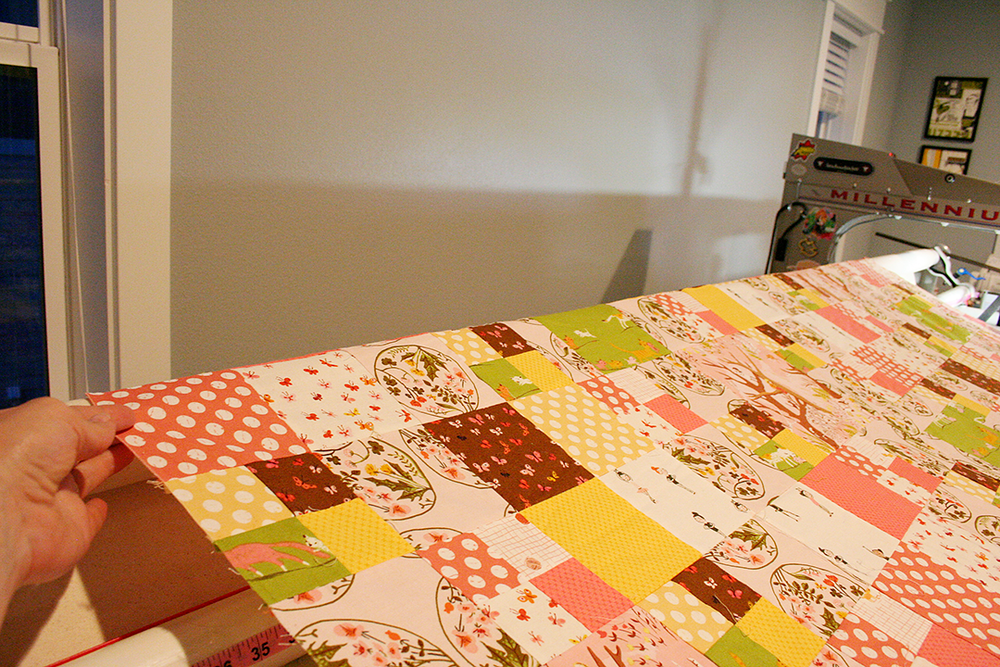
I drape the top of the quilt over the take-up roller, pulling the edge of the canvas from resting on the roller (shown below) and providing tension as I roll.

(Please forgive the change in quilt tops! I didn’t collect all the photos I wanted to the first time around.)
I now begin to roll the quilt top roller, stopping with every completed revolution and smoothing from the center out.

It’s particularly important to make sure the outside edges stay aligned (shown below). This takes some smoothing, twisting and even gentle pulling on the edges. With all the fabric and seams, twists and pile-ups are normal and need to be gently coaxed into submission.

I also readjust the quilt top by gently pulling each side out as it rests across the take-up roller to straighten it out as I’m rolling.
Keep rollin’, rollin’ rollin’…
I keep rolling until the top is nearly at the stitched registration line.

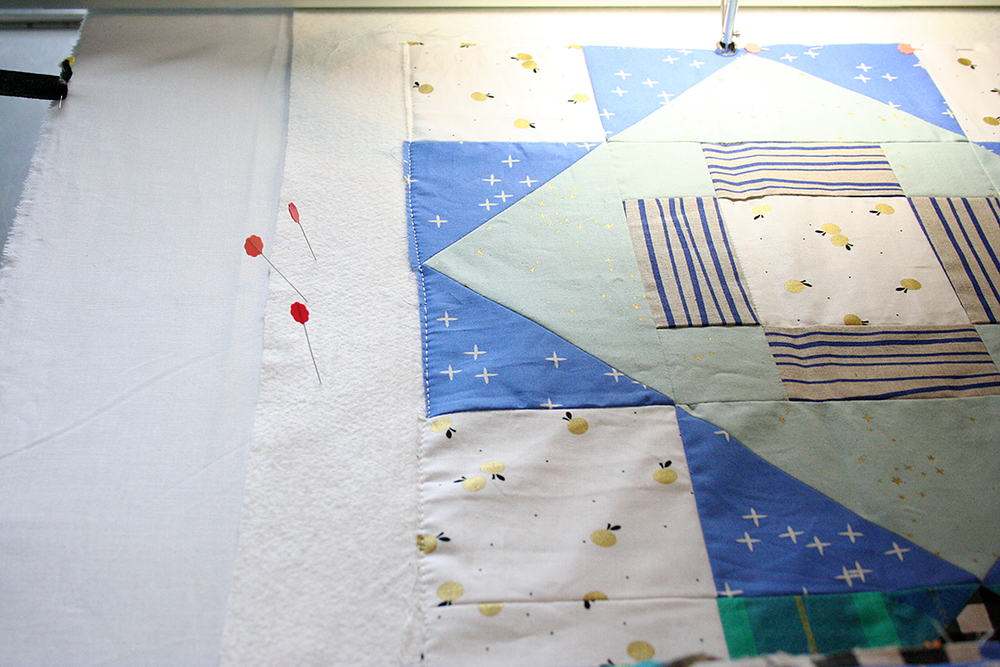
At this stage, I move to the back of the machine to pin the quilt top into place, right on the stitched registration line.
The photo below is how I view the top edge of the quilt from the other side of the machine. I use my trusty Clover flower head pins for all my pinning. And again, my process is to start in the center and pin out to the left, then back to the center and out to the right.

Here’s what it looks like (below) when I’ve got the top pinned. I typically place one pin traveling down each of the sides but find I don’t have to pin the whole side.

Lastly, from the front of the machine and on the left side (starting down as far as I can (as close to the quilt top roller as possible), I begin basting up the left side, across the top and down the right side, removing each pin as I go.
I don’t have a special “basting” stitch on my machine. As I’m rolling to new sections and basting down each side, I typically just use whatever speed my machine is already set at as it’s stitching pantographs. The goal is to get close to the edge without going off.
And there you have it! A loaded quilt top ready for the quilting magic! I love this stage! There’s a blank canvas, most of the work is done and there’s a world of possibility. :)
I hope that sharing my way of doing things is helpful to you!
Before you go, I wanted to mention that the Longarm League offers a course focused on the business of longarm quilting for others. It's called Rookie Season. It's great whether you're at the stage of shopping for a machine or if you're already up and running but want to dial in your systems, marketing plan, etc.
Jess Zeigler is the founder of and weekly contributor to the Longarm League.


